Chuyển đến nội dung chính

Hướng dẫn reset máy in brother 2701dw

  • Mở nắp cửa tháo hộp mực máy in ra, cụm cartridge gồm 2 phần : cụm trống và cụm mực.
  • Dùng tuốc-nơ-vít 4 cạnh vặn 2 con ốc tháo cụm bánh răng reset ra ( 2 con ốc nằm ở bên phía bánh răng ), bên phía bánh răng có 3 con ốc thì văn 2 con ra.
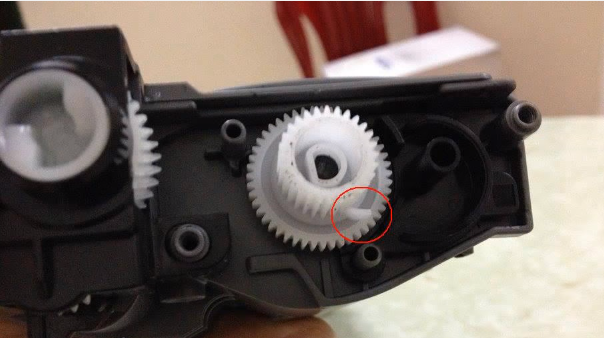
  • Tháo cụm cartridge ra chúng ta để ý vị trí của nẫy nhựa màu trắng ở vị trí bên trái của cung tròn.
1. vi tri oc vit
  • Tháo được cụm bánh răng reset ra ( hình ảnh )
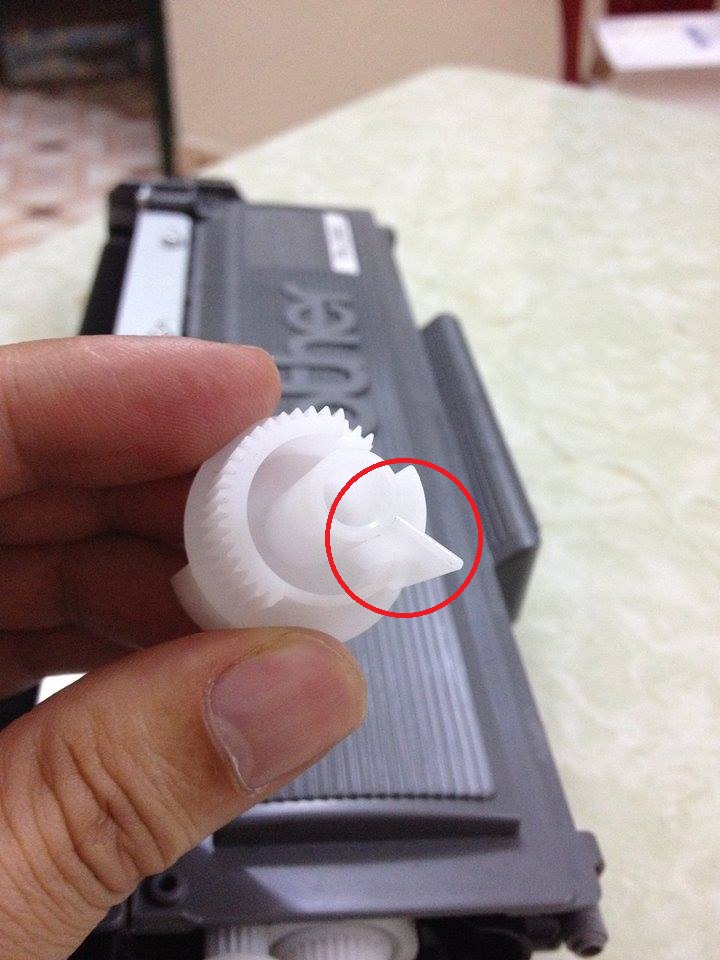
  • Bánh răng reset là bánh răng có gắn lò xo ở phía trên.
2. op nhua da thao
  • Tháo rời các bánh răng ra
3. thao banh rang
  • Nắp nhựa màu đen ( khoanh đỏ ) bạn dùng tua-vít 2 cạnh bẩy cái nắp ra để đổ mực vào trong sau đó nắp lại như cũ ( để ý không làm gãy hoặc méo trục nhựa màu đen để ráp bánh răng vào ).
4. nap do muc
  • Để ý khi máy in báo : “tonner empty ” trên màn hình nghĩa là máy đã hết mực.  
  • Đổ mực xong chúng ra lắp bánh răng như hình dưới để reset :
  • Bánh răng bên cạnh cũng phải đúng vị trí. vấu nhựa nhỏ trên bánh răng để theo hướng 4h.
5. banh rang dao muc
  • Hình bên dưới là bánh răng reset, để ý lắp đúng vị trí
6. banh rang reset
7. vi tri banh rang
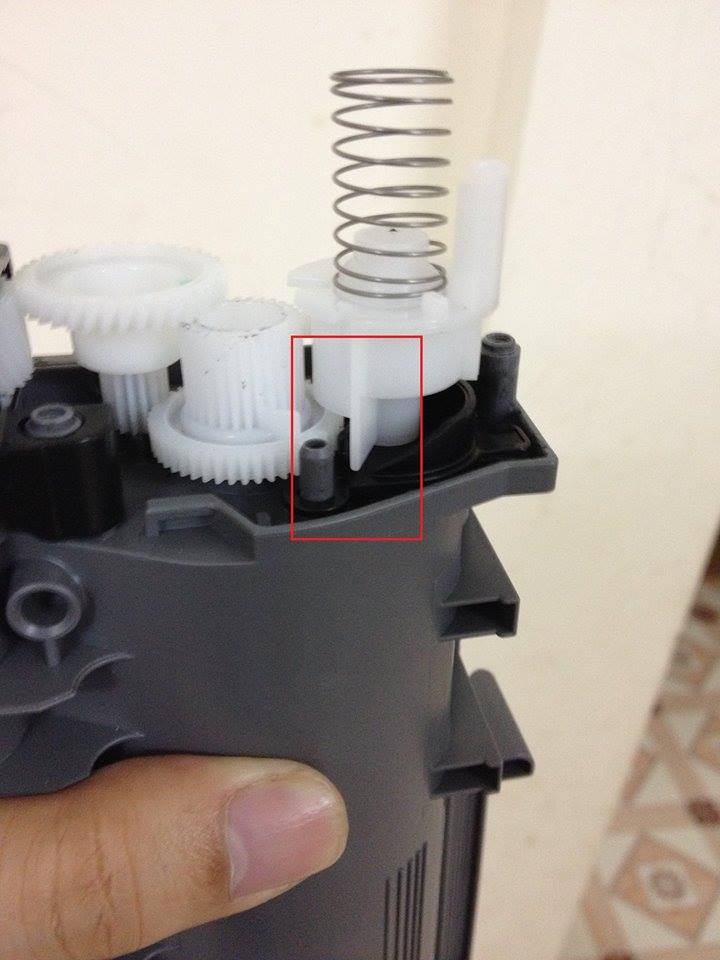
  • Khi đổ mực xong bạn chỉ cần lắp bánh răng quay về vị trí ( như hình ) là ok !
(hình ảnh )
  • Lắp chụp nhựa đen, lò xo vào và vặn ốc là ok !
  • Nếu không được thì máy sẽ vẫn báo ” tonner empty “ như thường. Các bạn làm lại từ đầu, chúc các bạn thành công !

Đổ mực máy in Brother MFC- 2701dw/L2700/2701d/2720DW/2740DW/DCP-L2500/2520D/2540DN/2321D/2361DN/2366DW

Các dòng máy in nêu trên đều dùng chung Hộp mực Brother TN2385.
Do vậy cách nạp mực và reset cũng tương tự như đổ mực máy in brother 2701dw.

Nhận xét

Bài đăng phổ biến từ blog này

Fake WiFi Access Point

Evil Twin Methodology Step 1 : We will first scan the air for a target access point. Then create an access point using airbase-ng with the same name and channel of the target access point, hence Evil- TWIN. Step 2 :The client is now disconnected repeatedly from the  original access point and as most modern system’s setting says… “Connect back to same ESSID(AP name) if disconnects”. This also happens because when the client disconnects from any access point it starts sending  probe requests  in the air with the name of the access point it connected to earlier. Hence  BSSID  isn’t a barrier, you just need  ESSID  to spoof the AP Step 3 : Clients is now connected to the Fake WiFi access point and now client may start browsing Internet. Step 4 : Client will see a web administrator warning saying “Enter WPA password to download and upgrade the router firmware” Step 5 : The moment client enters the password, s/he will be redirected to a loading ...

Steps to Configure your Zoho Account as POP in Outlook

Enable POP  in the Zoho Mail interface. Launch Outlook application in your system.  From the menu, browse to Tools » Account Settings » Email Accounts » Email tab Click New to open ‘ Add new email account ’ window. In Add New Account settings page, Select ‘ Manually configure Server settings or Additional Server Types ’ » Click Next Select Internet Email in the page that appears and Click Next to input the User Information.  User Information Your Name – Preferred Display Name E-mail Address – Provide your Zoho Account Email Address Account Type – Select POP3 for enabling POP Server Information for Organization users Incoming mail Server –  poppro.zoho.com Outgoing mail Server –  smtp.zoho.com User name –   you@yourdomain.com  (Your Zoho Account Email Address) Password – Zoho Account Password. Note: Provide Application Specific Password, if your account is TFA enabled.  Server Information for Personal users Incoming mai...