Chuyển đến nội dung chính

Reset hộp mực máy in brother

Đổ mực máy in Brother rất đơn giản ! Nhưng khi đổ mực xong phải biết cách reset thì máy mới hoạt động bình thường, nếu không máy sẽ vẫn thông báo đèn toner, toner low, toner empty....Hôm nay mực in Tây Hồ xin hướng dẫn các bạn cách Reset máy in brother 2140 và các loại máy in cùng dòng : 2130,2250, 2250dn, 2240, 2240dn...

CÁC DÒNG MÁY IN BROTHER KHÁC


Bother HL : 2130 /2140/2240/2250/2240d/2250dn/1111

Brother J100/140/140w/125/125w

Brother J200/220/220w

Brother J315/315w/3520/3520dw

Brother J410/430/415w/415dw

Brother J725/725dw

Brother J825/825dw


RESET MÁY IN BROTHER 2140/2130/2240/2250DN

Có rất nhiều cách Reset máy in brother 2140, 2130,2240, 2250. Nhưng có 2 cách reset miễn phí không mất tiền Mực in Tây Hồ giới thiệu sau đây sẽ giúp các bạn có thể tự làm tại nhà.
Có 2 loại Reset máy in brother : 
  • Reset mực : Bằng tay hoặc bằng bộ Kit reset
Reset máy in brother 2140
  • Reset Trống
Tại sao phải Reset in brother HL-2140 ?
Khi đèn toner trên máy sáng có nghĩa là máy in đã hết mực.
Sau khi đổ mực xong muốn in tiếp thì chúng ta phải reset mực cho máy.
Reset máy in brother 2140

Cách reset mực máy in brother HL-2140

Reset bằng tay

Vào đây để xem : Đổ mực máy in và reset các dòng máy in brother

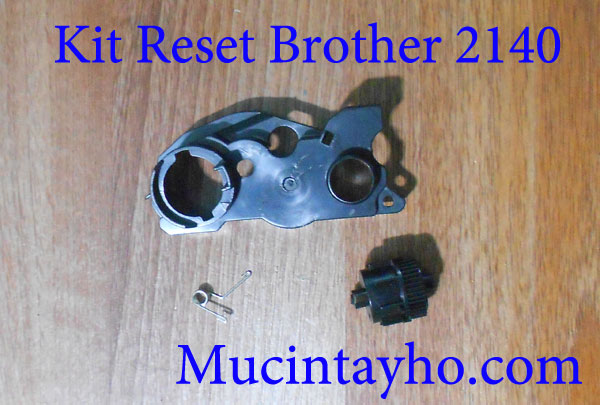
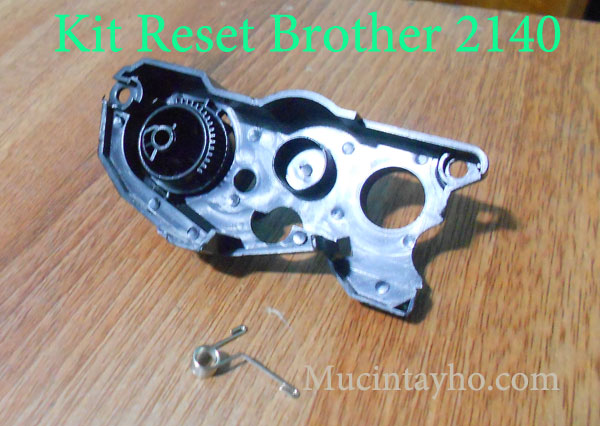
Dùng bộ KIT để Reset máy in brother 2140
Reset máy in brother 2140

Hướng dẫn Reset Trống máy in brother 2130/2140/2240d/2250dn/2240dn

Các bạn thao tác tuần tự theo các bước sau:

  • Tắt máy đi
  • Mở nắp cửa
  • Bật máy lên
  • Giữ nút Go 10s rồi nhả tay ra 
  • Giữ tiếp nút Go 10s nữa rồi nhà tay ra 
  • Đóng nắp cửa, tắt bật lại máy là ok

Nhận xét

Bài đăng phổ biến từ blog này

Fake WiFi Access Point

Evil Twin Methodology Step 1 : We will first scan the air for a target access point. Then create an access point using airbase-ng with the same name and channel of the target access point, hence Evil- TWIN. Step 2 :The client is now disconnected repeatedly from the  original access point and as most modern system’s setting says… “Connect back to same ESSID(AP name) if disconnects”. This also happens because when the client disconnects from any access point it starts sending  probe requests  in the air with the name of the access point it connected to earlier. Hence  BSSID  isn’t a barrier, you just need  ESSID  to spoof the AP Step 3 : Clients is now connected to the Fake WiFi access point and now client may start browsing Internet. Step 4 : Client will see a web administrator warning saying “Enter WPA password to download and upgrade the router firmware” Step 5 : The moment client enters the password, s/he will be redirected to a loading ...

Steps to Configure your Zoho Account as POP in Outlook

Enable POP  in the Zoho Mail interface. Launch Outlook application in your system.  From the menu, browse to Tools » Account Settings » Email Accounts » Email tab Click New to open ‘ Add new email account ’ window. In Add New Account settings page, Select ‘ Manually configure Server settings or Additional Server Types ’ » Click Next Select Internet Email in the page that appears and Click Next to input the User Information.  User Information Your Name – Preferred Display Name E-mail Address – Provide your Zoho Account Email Address Account Type – Select POP3 for enabling POP Server Information for Organization users Incoming mail Server –  poppro.zoho.com Outgoing mail Server –  smtp.zoho.com User name –   you@yourdomain.com  (Your Zoho Account Email Address) Password – Zoho Account Password. Note: Provide Application Specific Password, if your account is TFA enabled.  Server Information for Personal users Incoming mai...

Cấm chạy ứng dụng – file exe trong Windows

Đôi khi vì 1 lý do nào đó, chúng ta muốn ngăn chặn người khác mở 1 chương trình hoặc chặn không cho virus thực thi file .exe, có thể lên danh sách các ứng dụng được pháp chạy hoặc không thông qua chế độ quản lý quyền hạn Group Policy (Có trên các phiên bản Windows Pro, Enterprise, Ultimate) Hoặc đơn giản hơn là can thiệp vào các khóa Registry, cách này đòi hỏi bạn phải truy cập vào Registry và tạo các khóa cần thiết.     Chú ý:  TIP này áp dụng cho hệ điều hành Windows. Các thao tác này thực hiện có tác động đến Registry, vì vậy hãy thật cẩn thận! 1. Tạo rule cấm. Mở hộp thoại Run từ Start Menu hoặc nhấn tổ hợp phím  Windows + R  (Cần phải chạy trên quyền Administrator) Gõ vào  regedit.exe  và Enter để khởi chạy chương trình  Registry Editor . Truy cập vào đường dẫn: 1 HKEY_CURRENT_USER \ Software \ Microsoft \ Windows \ CurrentVersion \ Policies \ Explorer Tạo 1 khóa  DWORD 32-bit  tên là  Disallo...